Latest News
Fabulous Seating Wall Ideas for Your Patio 0
If your patio ideas include the feel of a stone enclosure around your paver patio and the benefits of addtional seating, then a block seating wall is your solution. Designed to fit most patio configurations, block seating walls can be strictly aesthetic or functional.
Whether your paver patio is used to entertain once or twice a year or every weekend, seating walls can provide you with additional seating necessary for your occasion. Below you will find lots of patio ideas for seating walls and helpful installation tips to assist you with your project.
Adding Creative Ideas to Block Textures
Using different textures of block in your seating walls and columns is one of those patio ideas that adds a subtle, but interesting affect to your paver patio.
A closer look at the contrast between the block. The column was constructed using a smooth tumbled 4" x 8" x 12" patio block and the seating wall was constructed using a rough textured split faced block (Allan Block Old Country Courtyard).
Serpentine Seating Walls are Great Ideas for Functionality
A serpentine seating wall not only adds interest to your patio design, but also adds functionality. This seating wall wraps the entire patio and provides overflow seating for guests as well as some privacy. Installing your seating wall behind the retaining wall cap instead of aligning the faces provides some depth to the outside appearance and is another idea to add interest to you patio.
This seating wall was constructed using Allan Block Old Country Courtyard and rest on matching blend Allan Block Europa Retaining Wall.

Another view of this paver patio better shows how the seating wall wraps around the entire patio.
Tumbled pavers were used for the patio surface.
Simple and Symmetrical Ideas for Seating Walls
This right angled seating wall not only gives this patio enclosure, but also provides overflow seating for this smaller area.
This seating wall and columns were constructed with tumbled 4" x 8" x 12" patio block. The columns feature an ornamental pre-cast cap.
 Another paver patio idea with symmetrical seating walls. This patio was raised and the seating walls also serve as a safety barrier for guests.
The seating walls enclosing this patio were constructed with Allan Block Old Country Courtyard block and the paver patio with non-tumbled cobble pavers.
__________________________________________________________________________________________
__________________________________________________________________________________________
 Creative Ideas Using Retaining Walls
 Creative Ideas Using Retaining Walls
Adding a short retaining wall around your paver patio is a creative way to provide overflow seating for guests.
This retaining wall serves as a beautiful seating wall and eventually evolves into block steps to access the upper yard. Built with Allan Block Classic retaining wall block and the paver patio was constructed using non-tumbled cobble pavers.
Seating Walls Provide Enclosure and Safety
Not only does this seating wall provide enclosure and warmth to this upper patio, but also as barrier keeping guests from falling to lower patio (pictured below). This patio also features an Allan Block Courtyard grill station and tumbled pavers.
The seating wall and columns were constructed using Allan Block Old Country Courtyard block.
Great patio idea for enclosure and safety!
A view from lower paver patio reveals the upper patio was raised substantially using Allan Block Europa retaining wall block. The seating wall is sitting on top of the retaining wall and serves as a barrier to protect guests.
Notice the tumbled 4" x 8" x 12" patio block columns to the left? They provide a nice contrast of texture between block.
Adding Architectural Influence to Your Seating Wall Design
This is a great example of how the architecture of your home should influence your patio design. The spindle style seating wall pulls out the beautiful handrail spindles on the balcony.
The seating walls and columns were constructed from tumbled 4" x 8" x 12" patio block. 
Seating Wall Alignment
When developing patio ideas for your project, a decision will need made whether to align your seating walls with the face of the retaining wall block. Or, the seating wall can be set back as shown in the photo above.
A seating wall that is set back off the face of the retaining wall block is one of those patio ideas that can add a lot of interest and depth to the outside appearance of your paver patio.
This patio is surrounded by an Allan Block Old Country Courtyard seating wall and tumbled pavers were used for the patio surface.
The raised paver patio above is raised by using Allan Block Europa retaining wall block. This block is also used to construct the radial steps to enter the patio. The seating walls were constructed with Allan Block Old Country Courtyard block.
Seating Walls Make a Nice Ledge for Flower Arrangements
Seating walls and columns are also great to show off your beautiful flower arrangements.
A closer look at the seating wall shows the rough texture of the Allan Block Old Country Courtyard block.
 Ideas for Seating Around Fire Pits and Hot Tubs
 Ideas for Seating Around Fire Pits and Hot Tubs
This is a creative idea for a stand alone paver patio. The fire pit is located on the edge of the circular patio while the seating wall was installed on the perimeter.
The seating wall was constructed with tumbled 4" x 8" x 12" patio block and the fire pit is a kit. The circular patio was built with non-tumbled cobble pavers.
This beautiful hot tub is surrounded by a tumbled 4" x 8" x 12" patio block seating wall and cobble pavers. This patio is connected to a larger paver patio that features an outdoor dining area and grill station for a roll around grill.
 Add separation between your patio and wood line.
 Add separation between your patio and wood line.
The tumbled seating wall provides definitive separation between this paver patio and the wood line. The paver patio features circular paver patterns is a perfect patio for a fire pit.
Notice this seating wall has no columns at the ends of the walls.
Patio Ideas to Light up Your Paver Patio
This column is home to a low voltage post light that will illuminate this are perfectly at night. The seating wall and columns were constructed with Allan Block Old Country Courtyard block.
Notice the paver light at the bottom of the column.
Adding low voltage down lighting fixtures to this patio's columns and seating walls will be a nice accent to these features at night.
The seating wall and columns on this paver patio were constructed from Allan Block Old Country Courtyard block and the patio with non-tumbled cobble pavers.
Patio Ideas to Dress Up Your Deck Post
Add some elegance to your deck posts by wrapping them with easy to install patio block. These post were wrapped with tumbled 4" x 8" x 12" patio block.
- Steve Combs
- Tags: Patio Ideas
A Patio Designed to Match the Style of it's Home 0

I posted in "How to Successfully Design a Paver Patio" that a good design will integrate your patio ideas into pleasing geometry that compliments the architecture of your home. With help from the customer, we were able to accomplish exactly that in the patio design for this French styled home.
When I first looked at this home, and probably you too, the first items that jumped at me were there are a lot of large rectangular windows, rectangular rooms, and accents as well as the arched brow window in this home. So, I knew immediately these unique features should influence the patio design.
After a brief discussion with the customer, we were able to compile a list of goals and ideas for a patio design. The first and most important item on their list was, they wanted a large patio for entertaining and they wanted it to be functional for family use as well. The second item was a fire pit area that could easily be converted to an outdoor dining area. And their last request was they wanted a patio that complimented their French styled home.
Initially, the plan was to use all rectangular and right angle geometry in the design, but the large arched window brow above the second floor balcony entrance kept grabbing my attention. So we incorporated a large arched, paved area for the patio table and outdoor dining into the patio design.
To gain some contrasting interest throughout the entire patio, we used a totally different style of paver to create some rectangular insets for the dining, bbq grill and fire pit areas. We also framed the entire patio using the same contrasting paver as an inside border.
To compliment the dining area, we designed a grill station with an attached bar for ease of entertaining. These are one of the most functional hardscape accessories you can add to your list of ideas for a patio. They not only provide an area for food preparation, but more importantly, it provides your guests with comfortable seating while you are grilling.
We came up with several fire pit area designs, but to keep it fun, simple and functional, we settled on this design. A square patio fire pit area with a seat wall for overflow seating and a fire pit that converts to a table. Perfect!
The customer also wanted us to create a patio design for a hot tub. Being the hot tub was existing, we had to design the patio around it. Not to shabby for an after thought!

To reflect more of the home style, we also added some formal landscaping around the patio.
Okay. Now you have a good idea of how to use some unique qualities in your home's architecture to influence your patio design. Now, Get Designing!
Learn more how we can help you turn your patio ideas into a functional design on our Custom Patio Designing page.
- Steve Combs
- Tags: Custom Patio Design Patio Ideas
Curvy Terraced Patio Design Creates Fabulous Outdoor Living Space 0
A curvy patio is just one of those items that is really fun to design, especially if it is a terraced patio. Kind of like when you were younger, and you would sit and draw all kinds of curves, blending them to see what cool ideas and designs you could come with. This paver patio reminded me of that, but the unique quality is it actually created some really functional outdoor living spaces, which is why we have included it in one of our favorite patio ideas.
Not only does this paver patio have lots of curves, but it is also tiered and raised to follow the grade. And all of these curves create steps leading to all the different outdoor living areas of this patio.
A couple of ideas I want to point out about this design is we used rounded boulders to retain the lower section of this patio. Also, we used flat stone, or outcropping, for steps leading from the patio to the lower walkout basement. Both of these ideas were perfect to add to the rustic appeal of this log cabin.
The outdoor dining area was placed on the upper level of this tiered patio for easy access and includes a grill station for a slide-in barbecue grill. This area is also enclosed with a seating wall that provides safety.

The second level includes a nice outdoor bar for entertaining....
and a 12' x 16' cedar pergola. Notice how we wrapped the column posts of the pergola with Allan Block columns.
A fire pit area creates the third level and was designed large enough to include chairs surrounding the built-in fire pit. Also, included in this area is a seating wall that frames in the fire pit area and provides additional seating.
The 4th and final level of this raised paver patio was designed as a hot tub area as well as an apron to step off the patio.
Material used for this patio:
- Pavers = Reading Rock Oxford Non-tumbled, Harvest Blend
- Seating Walls, Bar and Grill Station = Allan Block Old Country Courtyard Block, Stonecreek Blend
- Fire Pit = Reading Rock Bedford Radius Block, Buff/Pewter Blend
- Retaining Wall Block (used to raise patio and steps) = Allan Block Europa Block, Stonecreek Blend
Learn more how we can design an outdoor living space for you on our Custom Patio Designing page.
- Steve Combs
- Tags: Custom Patio Design Patio Ideas
Patio Design for Sloping Backyard in West Chester, OH 0
If you are one of the many homeowners that has a sloping backyard, but want a nice outdoor space to relax and unwind, this patio has some pretty cool ideas that may help you out.

Before I get carried away telling you about all the fun stuff, I want to get a little technical. Designing a patio for a slope is really no different than designing one for a flat yard. The only real difference, is the patio for a slope uses a retaining wall to make it level. So when calculating a budget for your patio, add some money for the cost of the wall.
Now for the fun stuff! This patio was a custom patio we designed for a customer in West Chester, OH. Fortunately for me, it was right down the road and I was able to whip down there, take a few photos and pull some measurements pretty quickly.
I met with the homeowner and his wife, who were super nice and awesome to work with, and they began to tell me what they wanted. A 400-500 square foot curvy patio with enough space for their existing table, a fire pit area and a grand set of entrance steps.
The homeowners were pretty specific about wanting to be wowed by the entrance steps and sent me several pictures of step ideas they liked. We slipped on our creative hat and designed this set of arced, stone steps using Allan Block Europa (tumbled) block.

We added a stone seating wall around the outdoor dining area using Allan Block Old Country Courtyard block. Perfect for additional seating and a protective barrier from accidentally falling off raised section of patio.

Here's a closer look at the fire pit area we designed. By using a portable fire pit instead of a built-in fire pit, this area can be used for other purposes.
To get more information on how we can help you bring your patio ideas to life, visit our Custom Designing page.
- Steve Combs
- Tags: Custom Patio Design Patio Ideas
Terraced Patio Design with Swimming Pool in Austin, Texas 0
 I love to design backyard getaways. Let's face it, patios with swimming pools, hot tubs, outdoor bars, ones with all the amenities are not only fun to look at, but they are great to dream about and pull ideas from. This patio design was for a customer building a new home on 50 acres in Austin, Texas, so we basically working with a blank slate.
The customer had two stipulations as far as the design. They wanted a terraced patio with the swimming pool on the lower terrace accessible from the walkout basement and the dining and outdoor bar on the upper terrace which could be accessed from the main living area. The other stipulation was they wanted the pool patio to be raised 16" - 18" from ground level.
Other than those two items, they gave us complete freedom to design a patio that was beautiful, functional and one that would bring out the "oohs and aahs" from their Texas friends.

We felt the shape of their patio should have lots of arcs and curves since they were installing a curvy swimming pool, but we wanted to add some unique features to the geometry. So we created two overlapping circles. One centered around the hot tub that created the shape for a section of the retaining wall and two paved steps leading off the hot tub patio. The other centered around the upper dining area that created the shapes for the lower tiered retaining wall, the paved stairwell, the dining area itself and two steps leading up to the outdoor bar. The result was subtle, but it created some interesting arcs and lines on the patio.
We also skewed the pool and designed the pool patio to be large enough to add plenty of furniture for entertaining.
We struggled a little bit when we go to the hot tub patio. The problem was we had this 7' plus tall retaining wall that was way overbearing for this area. So as you can see we bumped out a lower section of the retaining wall creating a seating wall around the hot tub. The other step we took to reduce some of the wall height was we raised the hot tub patio 16" and added stone to the face of the pool wall, which also gave us a pretty cool effect to the pool.
The paved spiral steps leading between the two terraced patios generated a softer staircase and added a little more interest to the the large patio. Also notice how we used a darker paver to contrast the lighter retaining wall block. Trust me when I say this, it's all the little ideas that make a patio look fantastic. And larger patios need more little ideas.
The dining area was designed into the upper terrace to make access to the main floor kitchen area more convenient. We also placed it right up against the retaining wall overlooking the pool patio.
A backyard getaway would not be complete without an outdoor bar and not just any bar, but a covered bar. The bar features an octagon shape, stone face, granite countertops, drop in grill, outdoor refrigerator and lots of seating for guests.
This was just one of those projects that was enjoyable to design. We hope we were able to provide some good patio ideas for your terraced patio with swimming pool.
Visit our Custom Designing page to find out more how we can help you bring your patio ideas to life.
- Steve Combs
- Tags: Custom Patio Design Patio Ideas
Patio Ideas - The Evolving Paver Patio 0
One of the qualities I favor in using pavers for your patio is the unique ability to add or expand your outdoor living space without any recognizable seams. This is a huge asset for those of you who want to install your "Dream Patio" in stages.
The paver patio pictured in this post illustrates this ability perfectly. It was designed and installed not just once, but 3 times to eventually evolve into this magnificent outdoor living space you see in these photos.
Phase #1: The original patio design and installation was a small 12' x 10' paver patio between the grill station and the side entrance as well as a horseshoe shaped retaining wall. Barely enough space for a small patio set and grill.
Phase #2: The second patio design involved increasing the size of the original patio, altering the retaining wall as you see it with radial steps, adding the grill station and installing a portable fire pit area.

Phase #3: And finally, the third patio design entailed installing a shed and adding two walkways, one to the shed and the other to the front of the house.
This paver patio illustrates some great patio ideas that provided this homeowner with a beautiful outdoor living space. To start, the patio design for this paver patio has some nice curves and radial geometry to help soften the box shape of the home and flows very nicely with the landscape.
Secondly, the design incorporated what was important to the homeowner. A grill station, seating wall (retaining wall) for overflow seating, a large outdoor dining area and a circular fire pit area for entertaining.
And last, the color blends chosen for this patio project compliments the home and shed. The buff in the pavers as well as the seating wall and grill station blend nicely with the home and shed. And mostly, the pavers really give this neutral colored outdoor living space a nice pop.
Patio Features:
- Reading Rock Oxford Pavers
- Harvest Blend Oxford Circle Kit
- Classic Allan Block for Retaining/Seating Wall
- Marbled Buff Radial Steps to Upper Yard
- Allan Block Courtyard Grill Station, Champagne Blend
- Steve Combs
- Tags: Patio Ideas
Patio Ideas that Turn Design Obstacles into Functional Accessories. 0

Every patio project seems to always have it's design challenges and this project was no different. The house was a beautiful tudor home located in Cincinnati and was one of those houses that deserved more than just concrete to walk, drive and entertain on. It was screaming for something to compliment the Old English style, a surface that would complete the style in which it originated from.
After a lot of thought and discussions with the homeowner, we felt that pavers would compliment their Tudor home better than any other material.
The next step was to start developing some patio ideas for this paver project. The homeowner wanted two paver patios, one upper and one lower. They wanted an upper patio that would be easily accessed from both their screened in deck that cover a walkout basement and from their side entry driveway. The upper patio would be used for outdoor dining, entertaining and they informed us they were avid barbequers. They wanted the lower paver patio for a possible fire pit and access from their walkout basement. And they wanted both to connect as if they were one paver patio.
How do you design two patios, separated 9' vertically, easily accessed, make them appear as one paver patio and hide concrete basement walls? The challenge begins!
We had to dig deep into our bag of creative patio ideas to not only design a paver patio that met the customer needs functionally, but would be aesthetically pleasing as well.
The design process was started with a rough sketch of the upper paver patio geometry and a determination of where it would be located vertically. We pushed the envelope on ease of access and established the location 3 1/2' below the screened in deck, 5 1/2' above the lower paver patio and 2' below the driveway. Locating the upper patio at this point better allowed us to shorten the height of the lower retaining wall that supports the upper paver patio and marry the upper and lower patios as one.
Since we lowered the upper patio 2' below the driveway, we needed a short retaining wall to help cover the exposed foundation along the house and steps for access. We designed a beautiful winding retaining wall that created a planting bed along the house and transitioned into a set of beautiful radial steps that provided access to the driveway. Being 2' tall, it was also perfect for overflow seating.
To keep guests from falling from the upper patio to the lower, we designed an Allan Block Courtyard grill station into a seating wall that followed the perimeter of the lower retaining wall.
The next step of designing the lower patio was a much simpler task than the upper patio. Once again, we reached into our bag of patio ideas and designed a curvy paver patio that complimented the upper patio. We incorporated circular paver pattern that created a perfect fire pit area, wrapped the deck posts with tumbled block and installed a seating wall between two of the columns to help separate the area from under the deck and the fire pit area.
Next, we added some stone steps that wrapped around the retaining wall that supported the upper patio and allowed traveling between the two patios safe and easy. The stone steps also gave the retaining wall block a more natural appeal.
Once we had a completed design, it was time for the fun stuff, choosing material and colors. Since we didn't want to compete with the colorful terra cotta brick on the home, we decided to use a neutral and natural color blend for both the pavers and block material. We chose Reading Rock's Oxford tumbled pavers and Allan Block's Europa, or tumbled, block for the retaining walls. We laid both in a very natural pattern to help compliment the Tudor style of the home.
Once we were completed, this homeowner also did a very good job in decorating this patio with wrought iron furniture and floral displays.
- Steve Combs
- Tags: Patio Ideas
Patio Ideas - Blending Paver Patio with Stamped Concrete 0
We had the great opportunity to design this beautiful paver patio addition a few years back. Awesome house, incredible pool, lanai, putting green...What else do you need?
The customer loved to entertain and wanted more space to incorporate their patio ideas of a pergola, more areas for outdoor dining, a larger area for lounge chairs and later, an outdoor fireplace. And all these patio ideas had to blend with the existing pool, stamped concrete patio and boulders behind the pool.
Next, steps gradually introduced a 24" tall raised patio into the lower existing stamped concrete. Wanting to soften the right angles of the pool and existing pool patio, we curved the retaining wall into the upper patio and created two radial steps down to a lower tiered paver patio. This gave us a dining area, which later became the fireplace area, and the gradual transition from upper raised patio to pool patio.
Having to work with an existing stamped concrete patio, we had two choices, either to blend or contrast with our choice of pavers. We chose to blend with Reading Rock's Coldstream paver that features a tumbled, textured surface that matched the existing stamped concrete patio.
The upper paver patio was large, expansive and was a great place to pull from the customer's list of patio ideas and incorporate a pergola. This allowed us to break up this large pavered area with some vertical dimension. We chose 4" thick cedar to give the pergola a more rustic and massive appeal. Fiberglass columns were slid over the pergola post to pull architecture from the home into the outdoor living space.
Later, the homeowner wanted to alter one the outdoor patio areas and include a more popular patio idea, an outdoor fireplace. To meet the customers budget, but use real working outdoor fireplace, we chose the Bedford fireplace kit from Reading Rock. Working with segmental pavers and wall block made this task easy and seamless.
Once the paver patio was completed, the homeowner took over and had a ton of fun decorating this outdoor living space with lots of colorful outdoor furniture and floral displays.
Patio Features:
- Reading Rock Coldstream Pavers, Riverbank.
- Allan Block Europa Patterned Retaining Wall, Stonecreek.
- Allan Block Europa Steps, Stonecreek.
- Cedar Pergola
- Allan Block Old Country Courtyard Seating Wal, Stonecreek.
- Bedford Fireplace Sr. Kit, Buff/Pewter.
- Steve Combs
- Tags: Patio Ideas
How to Install Pavers Over Existing Concrete Patio 0
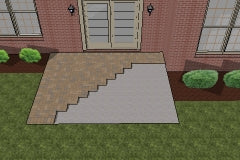 One of the simplest and easiest ideas to dress-up your existing concrete patio is to lay pavers over the top of it. Sounds too easy...right? It is really that easy, but there are a few items to consider before you get started. Click here if you want to learn how to install a larger paver patio over top of smaller existing concrete patio.
 First, your existing concrete patio has to be in good shape, i.e., no large cracks, a smooth surface with no signs of scaling or spalling. Secondly, make sure your existing patio slopes away from you home, meaning that when it rains, water runs away from your home. And lastly, the top of your existing concrete patio must be at least the thickness of your paver below your door's threshold.
 Step 1.
 Step 1.
Clean your existing concrete patio from all dirt and debris. It may be necessary to grind any bumps or ridges flat with surface.
 Step 2.
 Step 2.
Your paver patio will be more aesthetically pleasing if you install a border course. The border course will be the only pavers necessary to bond to the existing concrete. Use a quality professional masonry adhesive for this application.
Start laying the border course along your home, butting the pavers against the building and bonding them generously to your existing concrete patio. Continue laying and bonding the border course of pavers along the perimeter of your patio.
 Step 3.
 Step 3.
After the adhesive bonding the border course completely dries, you can begin laying the field pavers. Start the pattern in one corner and work your way across to the opposite corner. More than likely, you will need to cut pavers along the opposite sides.
Once all your pavers are laid, you are ready spread sand into the paver joints. Note: The pavers will probably be wobbly prior to installing the joint sand. Sweep the sand across the pavers allowing it to fall into the paver joints.
We recommend using a professional grade polymeric sand for your joints. This will help bond the pavers laterally and keep weeds from germinating between the joints. Be sure to follow the manufacturer's instructions for the polymeric sand installation.
Step 4.
Enjoy your new patio!
- Steve Combs
- Tags: How-To's
How to Install a Paver Patio 0
Is a paver patio one of those ideas you are considering to spruce up the rear yard? If so, not only do you need to know how to install a paver patio, but there are a few other items you need to know.
Pavers are available in a wide range of shapes, styles, sizes and color blends. Depending on the sizes you choose for your paver patio, there are large variety of patterns you can lay them in; herringbone pattern, running bond pattern, basket weave pattern, etc. View these and more paver patterns.
How much does a paver patio cost? If you contract a professional paver installer, you should plan on spending $15 - $20 per square foot, depending on paver type and where you live. This would include all materials and labor. If you are thinking of installing your paver patio yourself, you could expect to save approximately 50%.
Now that you have some basic information, let's learn how to install a paver patio.
Note: If you are have an existing concrete patio you may want to read our step-by-step instructions on "How to Install Pavers Over Your Existing Concrete Patio".
Step 1.
Create a design or plan and sketch it on a piece of paper. Or download one of our pre-designed paver patios that includes a material list and everything your need to plan your project.
Call your local utility protection service and have them mark any underground utilities where you will be digging.
Next, layout your new design in area where you plan installing the paver patio. In order to square up the patio (make the sides 90 degrees to your home), you need to establish a reference line perpendicular to your home. This can be accomplished by using two stakes and a string.
Set one stake in one corner of the patio against your home and the second stake out, along one side of your patio, but 90 degress to your home. Set the string 90 degrees by using the 3-4-5 triangle method. Starting at one of the corners that meets your home, measure 3' along your home and then from the same corner, measure 4' up one side of where your patio will be installed. The diagonal point joining these two points should be 5'. If not, adjust the 4' side until the diagonal measurement is exactly 5'.
Using the string and your home, you can begin laying out your patio with a measuring tape and marking paint.
 Step 2.
 Step 2.
How to excavate for paver patio. Determine vertically where the top surface of your paver patio will be in relation to your home. From this point you will excavate down approximately 9 1/2". This will allow for 6" of a compacted gravel base plus 1" bedding sand plus 2 3/8" of paver. Make sure to excavate so the patio will slope away from your home.
Additionally, excavate 8-10" outside the layout marking lines to allow for grave base overlay. Once all loose soil is removed, compact the excavated area with a vibratory plate compactor.
 Step 3.
 Step 3.
Installing the gravel base for paver patio. Begin the gravel installation by evenly spreading a crushed limestone with dust aggregate over the excavated area and compacting with vibratory plate compactor every 2". The compacted gravel is the heart and soul of your paver patio, so make sure you compact it thoroughly.
Continue adding paver base gravel until you have reached a 6" depth and are approximately 3 1/2" of finished paver height. Again you need to verify your gravel base slopes away from your home. Make sure the gravel surface is relatively flat, but sloping, by laying a straight 2 x 4 over the base, adding or raking gravel to achieve satisfying results.
 Step 4.

 Step 4.
Installing bedding sand for paver patio. Next, you want to evenly spread a course sand over the paver base gravel, creating a sand bed for the pavers to seat in. This can effectively and efficiently be achieved by laying two 1" diameter pipe approximately 10' long directly onto the gravel base as shown. We recommend using 1" galvanized electrical conduit pipe for it's inexpensive cost.
Start spreading the course sand, as even as possible, between the pipe and a couple of feet on each side. With a 2 x 4 approximately 8' long, start screeding the sand. More than likely you will have to fill in areas and re-screed to achieve a flat, uniform layer of bedding sand.
Once you complete one area, remove the pipe and fill in with troughs created from the pipe. These area can be smoothed using a bull float. Move the pipe to a new location and begin the process again until the entire pavered area has a uniform and flat layer of bedding sand.
 Step 5.
 Step 5.
Installing a border around paver patio. In order to achieve professional looking results, it is essential to install a paver border, whether it is the same blend as your field pavers or not.
Before you start laying the border course, it will be necessary to re-layout your patio with marking paint. Beginning in a corner closest to your home, lay the pavers along your home and out along the layout string you set earlier and following your layout marking until the entire border is laid.
 Step 6.
 Step 6.
Installing the field pavers. Start laying the paver pattern in one corner and work your way across to the opposite corner. In most cases, the paver along the opposite sides will need cut or trimmed to fit your design.
 Step 7.
 Step 7.
Installing the joint sand to paver patio. After you have laid all the field pavers, it is time to install the paver restraint. This is a pretty simple installation and is self explanatory. Just lay the edging up tight against the pavers, down on the gravel and begin installing the 12" spikes into ALL the spike holes in the paver edging.
 Step 8.
 Step 8.
Installing the joint sand to paver joints. As with all the above steps, how you install the joint sand is very important. Choose either a fine sand or a polymeric sand manufactured for pavers. We recommend a professional grade polymeric sand to keep weeds from germinating in the joints.
Start by spreading the sand over the entire paver patio and sweeping it into all the paver joints. With access still on the pavers, begin running the plate compactor all over the top of the pavers. This will vibrate sand into the joints, but more importantly seat the pavers into the bedding sand. Once finished sweep off the excess sand. If you are using polymeric sand, follow the manufacturers instructions.
 Step 9.
 Step 9.
Enjoy your new paver patio!
- Steve Combs
- Tags: How-To's